Edit and improve a cover
Refine any cover in BeYourCover: edit text, restyle typography, transform artwork, convert between styles, and chat with Cover Expert for guided fixes.
Last reviewed against the product: August 25, 2026
Open the editing tools
Select a cover, then open Image editing. On mobile, open the cover action sheet and choose Edit cover.
Advanced editing tools are available to Pro and Enterprise users. The interface shows the credit cost before a generation-based edit.
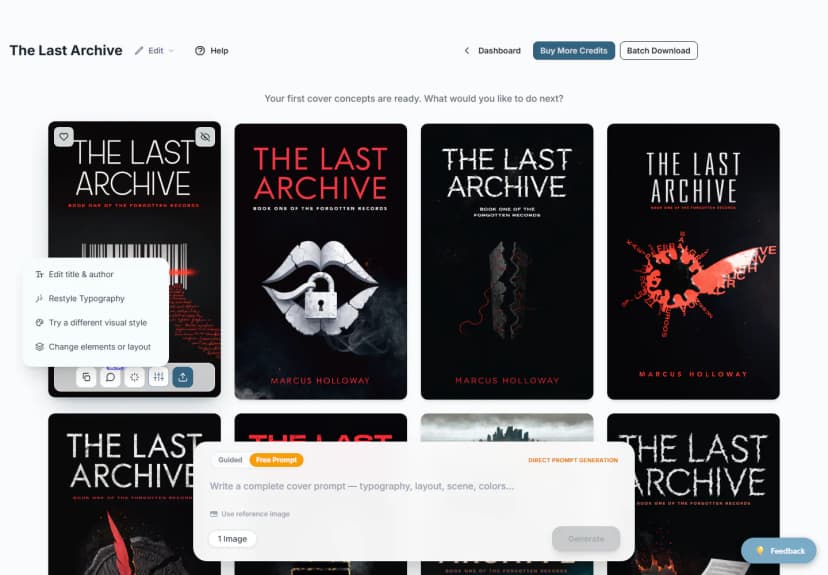
Edit cover text
Choose Edit title & author.
For supported covers, BeYourCover detects the existing text and separates it into editable layers. Text detection uses one image credit the first time; reopening a cached layout does not repeat detection.
After detection you can:
- Select and drag title, subtitle, author, and other detected text layers, or nudge the selected layer with the arrow keys (hold Shift for bigger steps).
- Add, duplicate, show, hide, or delete any layer from the Text layers panel.
- Change the font and font size, letter spacing, and line height. Type an exact size into the size box, or use the arrows beside it to step up and down.
- Set text color from suggested swatches, a custom picker, or the eyedropper.
- Align text left, center, or right, and center the text box horizontally or vertically on the cover with one click.
- Apply bold, italic, underline, strikethrough, or uppercase.
- Add a drop shadow or an outline to make text readable over busy artwork.
- Zoom the canvas and fit it to the screen.
- Save a new composite cover version.
Add, hide, or delete text layers
The Text layers panel lists every layer on the cover. Click a row to select that layer on the canvas, use the eye icon to show or hide it, or the trash icon to delete it. Add text layer creates a new layer in the middle of the cover — drag it into place and style it like any detected layer. Hidden layers stay in the layout but are left out of the saved cover.
On a desktop screen the panel floats to the left of the cover. On a phone it sits at the bottom of the screen as a Text layers bar showing the selected layer — tap it to open the full list, and it closes again as soon as you pick a layer, so the cover stays visible while you work.
If traces of the original text are still visible on the background, select Remove leftover text in the top bar and confirm — it re-runs the AI eraser on the background, free, in about 20 seconds. Each run cleans whatever is still there, up to three runs per cover; if text remains after that, re-run text detection instead.
Some covers use the earlier advanced text editor. It also supports choosing original or text-free base variants, showing or hiding title/author/subtitle, line splitting, font styles, colors, alignment, shadows, uppercase, text backgrounds, and gradient overlays.
Text editing saves a new cover result. Review the saved version in the cover grid before exporting.
Restyle typography
Choose Restyle Typography when the words are correct but the type treatment feels weak.
BeYourCover analyzes the cover and suggests up to three typography directions. You can:
- Select one to three suggestions.
- Reuse a suggestion's full prompt and modify it.
- Ignore the suggestions and write custom typography instructions.
Each selected direction creates one new cover and uses one image credit. Custom instructions create one cover.
You are only charged for the covers you get. If a direction fails, its credit is returned — a restyle that produces two covers out of three costs two credits, and one that produces none costs nothing.
Good custom instructions describe hierarchy and treatment rather than only naming a font:
Make the title a tall condensed sans serif in uppercase, increase spacing, keep the author small, and use warm ivory type with a subtle shadow.
Change elements or layout
Choose Change elements or layout to transform the visual content with a natural-language instruction.
Examples:
Replace the dragon with a burning sword.Change the background to a misty pine forest.Remove the second figure and move the title higher.
The transformation uses one image credit and creates a new version. If the run fails, the credit is returned. Describe one coherent change per run; a long list of unrelated changes is harder to preserve accurately.
Try a different visual style
Choose Try a different visual style to convert the existing concept into another template or visual family.
- Review templates recommended for the book's genre.
- Expand Other Styles if needed.
- Select a template.
- Confirm Convert Style.
Style conversion uses one image credit. If the run fails, the credit is returned. Converting illustration to photorealism is experimental; the most reliable results stay within similar categories, such as illustration-to-illustration or photo-to-photo.
Create or view a text-free cover
The Free-text eBook Cover action removes the title and author from the image. After it is generated, the action changes to See Free-text eBook Cover.
Use the clean version as a base for custom typography or external layout work. The preview window can create and download a high-resolution text-free version.
Generating the text-free version uses one image credit. If the run fails, the credit is returned.
Use AI Cover Expert chat
Select AI Cover Expert chat to discuss the selected cover. The chat opens empty, with the conversation tied to that cover, and offers a few suggested openings:
- Analyze my cover and propose new approaches — a critique of what is working, plus fresh directions worth exploring.
- Check how it reads as a thumbnail — how the cover holds up at Amazon search size.
- Does it signal my genre? — whether a browsing reader instantly knows what kind of book this is.
These are shortcuts, not a menu you have to pick from. The message box is active as soon as the chat opens, so you can skip them and say what you actually came for — a change you want, a question about your audience, or a description of an element to fix.
Unlike the other advanced editing tools, the chat is also available on free accounts — chatting costs nothing, while applying a proposal or generating a version uses a generation credit from your balance (if you have none, the upgrade screen opens).
You can:
- Explain your audience, market, or visual goal.
- Ask what is not working.
- Choose between proposed directions.
- Generate a proposed full version for one credit.
- Apply a localized edit for one credit.
- Create an audiobook cover when the expert recommends that output.
- Switch between cover versions discussed in the conversation.
Chat messages themselves do not consume image credits. Applying an edit or generating a version does. Saved conversations resume when you reopen chat on the same root cover.
Describing an object exactly
When a specific element has to look a particular way — a weapon, a piece of clothing, an artifact that recurs across a series — write out the full description rather than a short request. Detail is used as written: the expert carries your wording into the edit unchanged instead of condensing it, so constraints such as no rivets, a straight flat spine, or a subtle edge-catch, not an all-over glow reach the renderer intact.
State what the thing is not, as well as what it is. Negative constraints (not steel, no glowing runes, no ornamentation) do more work than adjectives alone. If several attempts drift away from your description, ask the expert to generate a new full version built around it rather than continuing to edit — a fresh version bakes the description into the cover's own prompt, so later edits keep it.
A short request works too — make the cloak more epic is a perfectly good thing to ask. The expert turns that into specific direction for you, deciding what changes in shape, scale, movement, and lighting deliver it. Describe the element in full when you already know exactly what you want; ask in a sentence when you would rather the expert make those calls.
The same expert is also available book-wide as the Chat mode of the generator bar, where you can @-mention any of your covers to iterate on them — see Continue an existing book.
Edit in the right order
For fewer wasted credits:
- Settle the overall visual concept.
- Use style conversion or transformation for major artwork changes.
- Generate close variations.
- Restyle or manually edit typography.
- Create text-free, audiobook, marketing, and print outputs from the final cover.